 DeepDive 中文 关系抽取实践
特别提示:本文只完成了一小部分,后面的很多步骤因为种种原因没有再做下去了,文中未完成的后半部分,建议参考下面给出的几篇内容中的介绍
安装DeepDive,使用公司股权交易数据 进行简单的中文关系抽取尝试。
主要参考: 1)知乎专栏 https://zhuanlan.zhihu.com/p/43143014 2)DeepDive官方文档 http://deepdive.stanford.edu/quickstart 3)OoenKG http://www.openkg.cn/dataset/cn-deepdive 4)神马搜索构建过程 https://yq.aliyun.com/articles/544941#
本教程在 ubuntu 16.04 进行。
# 安装 DeepDive
运行
bash <(curl -fsSL git.io/getdeepdive)
显示出安装选择界面后,选择1, 安装DeepDive。然后程序开始下载DeepDive安装包,约100M。
下载完成后,会自动进行解压,到/home/YOUR_USER_NAME/local/下。
修改 ~/.bash_rc 加入:
export PATH=/home/YOUR_USER_NAME/local/bin:"$PATH"
source一下 ~/.bash_rc,输入 deepdive 如果有提示,则说明安装成功。
安装过程中会进行 apt-update,可能会遇到某些问题,尤其是电脑中装了一些软件添加了一些第三方源之后。可以到系统软件更新设置里面关掉有问题的源。
# 安装 postgresql
安装这个数据库的作用是存储你的文本语料等信息。
bash <(curl -fsSL git.io/getdeepdive) postgres
安装成功后,输入psql 会有提示(database YOUR_USER_NAME does not exist)。
# 获取本次实验的数据
实验采用来自国泰安数据库的数据,已处理好的数据包含在 CN-DeepDive 项目包中,所以需要从 http://www.openkg.cn/dataset/cn-deepdive 下载整个CN-DeepDive 项目。
CN-DeepDive 中虽然也包含了一套配置好的中文版DeepDive,但尝试安装时遇到过问题,所以上面安装DeepDive的时候,还是从官方源来进行安装,而不使用这里面的CN-DeepDive。
解压后,取出其中的 transaction 文件夹,就是实验需要的股权交易数据。
transaction_dbdata.csv 中包含已确定存在股权交易的实体对,作为训练数据。articles.csv 是要抽取的语料。
# 配置中文
DeepDive需要用到 Stanford CoreNLP 中的一些功能,因此处理中文时需要下载额外的中文模型 。
下载此链接 http://nlp.stanford.edu/software/stanford-chinese-corenlp-2016-01-19-models.jar 中的中文模型。
下载后,将jar文件放置到 transaction 下的 udf/bazaar/parser/lib 下。然后在 udf/bazaar/parser/ 下,运行命令进行编译。
sbt/sbt stage
编译完成后,运行下列命令开启parser:
./run.sh -p 8080
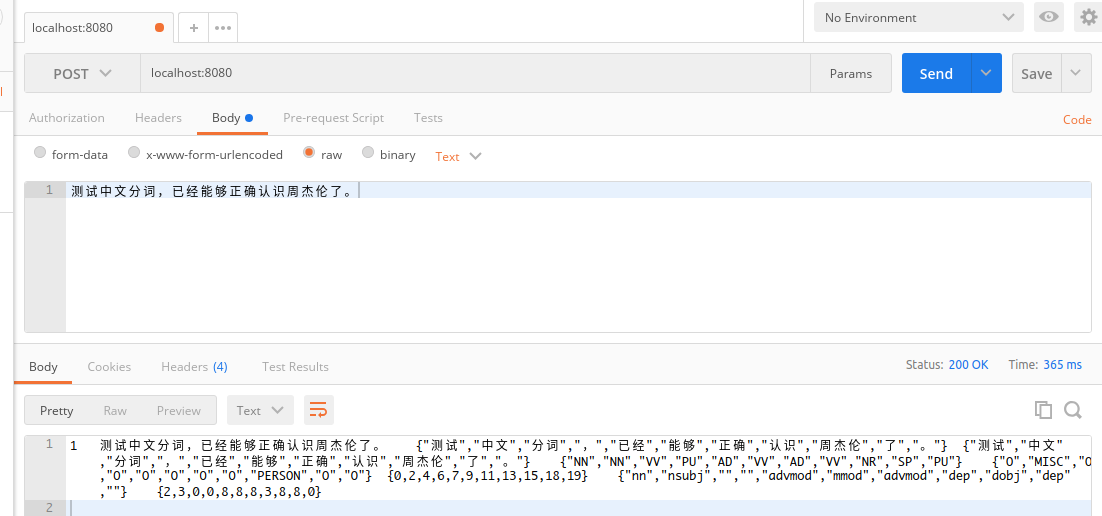
可以测试一下向 localhost:8080 POST 一段中文,能够正确进行分词和标注。
# 配置实验数据库
DeepDive运行过程中,需要把一些数据和信息存放到数据库中,所以需要先在postgresql中创建一个用于存放 transaction 项目信息的数据库。
psql postgres

CREATE DATABASE transaction OWNER 你的用户名;

# 创建完成后输入 \l 可以列出所有数据库,能看到刚才创建的。
postgres=# \l

# \q 退出postgresql命令行模式
\q
2
3
4
5
6
7
8
9
然后修改transaction文件夹下的db.url中的内容为新数据库的URL:
postgresql://localhost/transaction
# 导入已知实体对
app.ddlog 中,定义已知实体对transaction_dbdata 的格式
@source
transaction_dbdata(
    @key
    company1_name text,
    @key
    company2_name text
).
2
3
4
5
6
7
执行命令导入数据:
deepdive compile

deepdive do transaction_dbdata
2
3
输入第二行命令后,会使用默认编辑器打开一个配置文件,只需保存此文件,程序即可继续执行下去。
可查看导入的数据:
deepdive query '?- transaction_dbdata(company1_name, company2_name).'
# 导入待抽取语料文章
app.ddlog 中,定义待抽取文章 articles 的格式:
@source
articles(
	@key
	@distributed_by
    id      text,
    @searchable
    content text
).
2
3
4
5
6
7
8
数据导入和查询:
deepdive compile

deepdive do articles

deepdive query '?- articles(id, _).'
2
3
4
5
# nlp文本预处理
使用 Stanford CoreNLP 进行文本的基本处理。 在 app.ddlog 中定义 sentences ,存放处理结果:
@source
sentences(
	@key
    @distributed_by
    doc_id         text,
    @key
    sentence_index int,
    @searchable
    sentence_text  text,
    tokens         text[],
    lemmas         text[],
    pos_tags       text[],
    ner_tags       text[],
    doc_offsets    int[],
    dep_types      text[],
    dep_tokens     int[]
).
2
3
4
5
6
7
8
9
10
11
12
13
14
15
16
17
定义NLP的处理函数 nlp_markup
# 声明函数nlp_markup,输入是 doc_id和content,输出格式是 sentences。函数调用 udf/nlp_markup.sh 来完成其功能。
function nlp_markup over (
        doc_id text,
        content text
    ) returns rows like sentences
    implementation "udf/nlp_markup.sh" handles tsv lines.
2
3
4
5
6
udf/nlp_markup.sh 文件中主要实现了对nlp工具的调用。
下列语句实现了对 nlp_markup 函数的调用(从articles中读取信息,经过函数处理后,存放到sentences中:
sentences += nlp_markup(doc_id, content) :-
    articles(doc_id, content).
2
执行命令开始处理:
deepdive compile

deepdive do sentences
2
3
注意:执行上面的处理命令 ,对articles中的全部内容进行处理的话需要较长时间(我跑了约40分钟),也挺占内存,可以在导入articles数据的时候进行一些限制,比如修改tsv只取前面几条,或者导入postgresql之后另建一张表只取前面几条。
使用下面的命令来查看sentences的结果:
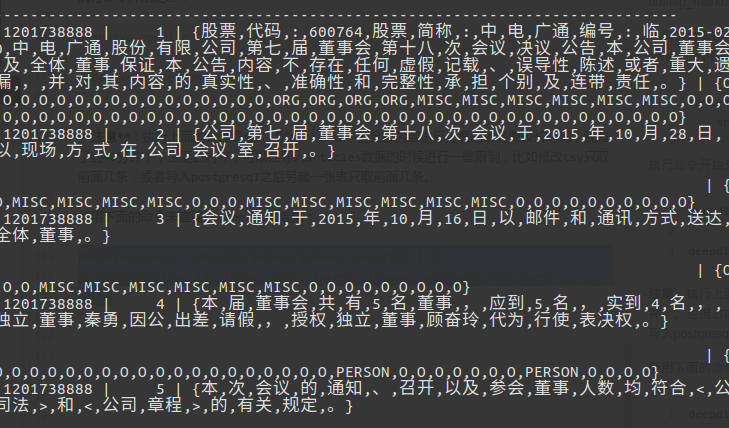
deepdive query ' doc_id, index, tokens, ner_tags | 5
?- sentences(doc_id, index, text, tokens, lemmas, pos_tags, ner_tags, _, _, _). '
2
# 实体抽取
在 app.ddlog 中定义实体:
@extraction
company_mention(
	@key
    mention_id     text,
    @searchable
    mention_text   text,
    @distributed_by
    @references(relation="sentences", column="doc_id",         alias="appears_in")
    doc_id         text,
    @references(relation="sentences", column="doc_id",         alias="appears_in")
    sentence_index int,
    begin_index    int,
    end_index      int
).
2
3
4
5
6
7
8
9
10
11
12
13
14
定义抽取候选实体的函数 map_company_mention
function map_company_mention over (
        doc_id         text,
        sentence_index int,
        tokens         text[],
        ner_tags       text[]
    ) returns rows like company_mention
    implementation "udf/map_company_mention.py" handles tsv lines.
2
3
4
5
6
7
抽取候选实体的具体方法,是在 udf/map_company_mention.py 等一系列python文件中实现的。思路大致是,实体识别为 ORG 的一系列连续 token,被认为是一个实体,然后拿这个实体去和 udf/company_full_short.csv 中的实体词典进行匹配,确认实体。
定义抽取候选实体函数的输入输出,进行调用,得到 company_mention。
company_mention += map_company_mention(
    doc_id, sentence_index, tokens, ner_tags
) :-
    sentences(doc_id, sentence_index, _, tokens, _, _, ner_tags, _, _, _).
2
3
4
5
编译执行。
deepdive compile

deepdive do company_mention
2
3
执行时可能会出现找不到文件
company_full_short.csv的错误,修改transform.py文件开头处的文件路径为绝对路径即可。
看看效果:
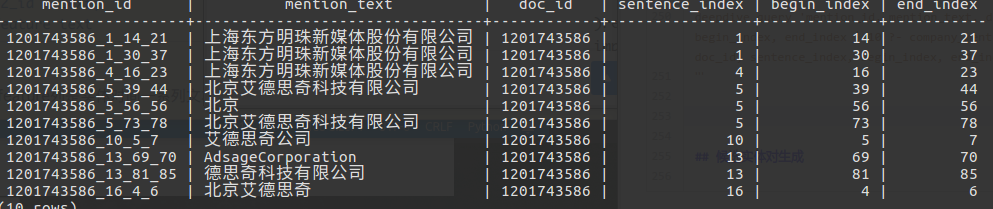
deepdive query 'mention_id, mention_text, doc_id, sentence_index, begin_index, end_index | 10 ?- company_mention(mention_id, mention_text, doc_id, sentence_index, begin_index, end_index). '
# 候选实体对生成
定义候选实体对:
@extraction
transaction_candidate(
    p1_id   text,
    p1_name text,
    p2_id   text,
    p2_name text
).
2
3
4
5
6
7
统计每个句子中出现的实体个数:
num_company(doc_id, sentence_index, COUNT(p)) :-
    company_mention(p, _, doc_id, sentence_index, _, _).
2
定义过滤函数:
function map_transaction_candidate over (
        p1_id         text,
        p1_name       text,
        p2_id         text,
        p2_name      text
    ) returns rows like transaction_candidate
    implementation "udf/map_transaction_candidate.py" handles tsv lines.
2
3
4
5
6
7
transaction_candidate += map_transaction_candidate(p1, p1_name, p2, p2_name) :-
    num_company(same_doc, same_sentence, num_p),
    company_mention(p1, p1_name, same_doc, same_sentence, p1_begin, _),
    company_mention(p2, p2_name, same_doc, same_sentence, p2_begin, _),
    num_p < 5,
    p1_name != p2_name,
    p1_begin != p2_begin.
2
3
4
5
6
7